Monday, February 21, 2011

Zucchini pancakes

Thinking what to have for breakfast? Want something tasty, yet health? Think no further.
I make these pancakes for my family often, sometimes changing up what will I put inside. Today I had some zucchini, so it was the perfect time to make health orientated pancakes.  They are very quick to make, the kids can easily participate in the process, and the aroma of the pancakes is sure to wake even the biggest sleeper up.


You will need:  
2 small zucchini
1 tbsp sugar
1/3 tsp salt
half a cup of milk
3/4 cup flour
2 eggs


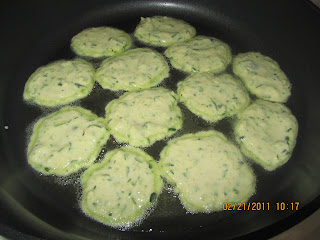
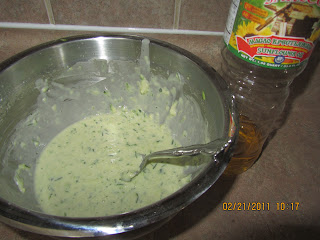
Grate the zucchini with the grater. Put all the other ingredients, except the flour. Mix well. Add flour slowly. You can use the electric mixer, to eliminate all the flour balls. The consistency should be like sour cream thickness. Or, when you put a spoonful of the batter on the pan, it should form the little pancake. Make sure is not too thick, you do not have to flatten the pancake in a pan with a spoon, it should be able to do it on its own. If the batter is too thick, simply add more milk. Fry them in a little bit of oil, about few tbsp for a big, non stick pan. They do not tend to absorb the oil, so don't worry. I use sunflower oil, unrefined, only because it's more healthy. You can use any oil you like.
Eat while hot, garnish with sour cream, your favorite jam, or nothing at all. They are so tasty, fluffy and juicy on their  own, that you may not need any extras.
Next time, you may want to make the same pancakes, except, instead of zucchini, you can add grated apples. Use 2 big or 3 smaller apples.
For those who are not used to such pancake recipe, I want to mention, these pancakes do not need any baking soda. They will rise with eggs slightly, they are very thin, somewhat similar to crepes, just a smaller version of it.
If you don't want, or don't have, zucchini, apples, etc, you can easily make them without it. It tastes really good. I make plain pancakes ofter, just then I like to add some vanilla. You won't be disappointed! 

Monday, February 14, 2011

Valentine gifts

Wanted to show how easy it is to make a pretty bag for your small kids, so they can take it to school and impress their teachers and friends.

St. Valentine cookies

 Happy St. Valentines everyone!
It is still not too late to impress your loved one. Originally, I was making these for my son to take to school. I wanted this day for him to be special. We wrapped each cookie into a little bag, put a card with 'Cars' in it , and today he took it to school for his 'girl friends' and teachers. He was very proud of himself! The girls were happy and impressed. Overall, a big success!


These cookies are quiet simple and easy to make. The patience comes in handy when cutting the forms. I bought mine at the dollar store. You can use any forms you have. If you want similar look, you will need two forms with the same pattern, just one smaller than the other.
I doubled the recipe and it was just a nice amount of cookies to share with friends. I will give you a single amount, which will make about 12 double layered cookies.


You will need:
1.5 cups sifted flour
1/4 tsp salt
1 cup of butter (or half of the big stick, about 230 gr), room temperature
1/2 cup confectioners sugar, or otherwise known as sugar powder
1 tsp pure vanilla extract

For the filling: 1/4 to 1/2 cup of your favorite jam, raspberry is the best.

1. Beat the butter with electric mixer, until smooth, about 1 min.
2. Add sugar powder, beat some more, about 2 min.
3. Add vanilla extract, mixing for another 1 min.
4. Gently stir in sifted flour. Don't add all flour at once. The dough should be soft and forming a nice ball.

On the counter, roll a piece of dough, about 3-4 mm, thick. Cut the shapes. Transfer to baking sheet and bake for 10-15 min at 350 F., or lightly brown around the edges. These cookies shouldn't be brown on top.
The next baking sheet, cut the big shape, put the smaller shape in the middle, and take only the outside shell, cutting out the middle.
To assemble. Have the jam ready, mine was fairly hard, so I used about half a tsp for each cookie. The top of the cookie, dust with sugar powder prior to sandwiching them. Do not put too much jam, as it will run, once you sandwich the both parts.
Take the bottom part, put some jam, then put the top part, give a light squeeze.
If you don't have so much patience or time, you can simply make both cookies the same size, without the cut out, and sandwich them together with jam. Maybe it won't look as pretty, but it sure will taste just as good!

Monday, February 7, 2011

Lemon Cupcakes

Lemon cup cakes

Lemon cup cakes with icingg

In the making. Add a teaspoon of batter in  a medium sized forms

Here you can see the fluffy batter and two teaspoons, with one I put the batter in, with the other one I scoop the batter from the spoon

Golden top, made with real lemon juice and sugar


These beautiful cup cakes I found in one of the blogs I fallow 'The Sunny Kitchen'.
I had never made cup cakes before, this was my first try and definitely not the last. I fell in love with these miniature cakes. What's not to love, when it comes out so well from the very first time!

You will need:
1 1/4 cup of sifted flour
1 tsp of baking powder
1/2 tsp of salt (I omitted that because I used salted butter)
115 gr. butter, room temperature
1 cup of sugar
2 big eggs
1/2 cup of milk
1 lemon zest
1 lemon juice (use from the same one you grated the zest off)
If you like lemon, like me, you can use two lemon zests in your batter, because you will need another lemon juice for 'icing'.

For the non - non traditional icing
1/2 cup of sugar
1 lemon juice

1. Beat the butter and sugar with the electric mixer, until fluffy, you may need to scrape sides with spatula few times. I mix for about 5 good minutes, just to make sure it is as fluffy as possible.
2. Add eggs, one at the time, continue on beating well, to get lots of fluff.
3. Add lemon zest and one lemon juice. Beat with the mixer some more.
4. Add milk. Surprisingly, it does not cured.
5. Sift flower in a separate medium size bowl, add baking powder.
6. Start adding flour with baking powder to the mix. The batter should be about the thickness of a sour cream.
7. Get the flat baking form, line the cup cake paper forms, start filling them with the batter. Do not fill to the top. You will need to fill about 1/3. I have baked these in mini and medium forms. Either one is fine, mini forms require extra patience, though, that I don't have too much of.
Bake at 350 F for about 15-20 minutes, until golden.
8. For the 'icing', mix lemon juice with sugar. If the sugar doesn't melt and there is not enough liquid, heat it on the stove a bit. I just put on the hole, where the heat comes from the oven. Easy. Doesn't burn, yet melts some sugar. The mixture should have some sugar granules, though. It's a nice surprise, when you bite into a cup cake and find lemony sugar on top, instead of a melted juice, that could make your cup cake too soggy.
9. Once your cupcakes are ready, poke the tops with the fork, just few times, put half a teaspoon of lemon-sugar mix.


If you want to try to top these lovely cup cakes with the more regular icing, here it is. I tried it, it's very good. My son looked at it and didn't even try it. So, that idea is out for me.

Regular lemon icing.
200 gr of butter, room temperature
400 gr of cream cheese (like Philadelphia)
3/4 pounds of sugar powder, otherwise known as confectioners sugar
1 1/4 tsp of vanilla extract
1 lemon juice
You can use these products according to your likes and taste. But the ratio should be similar to this.
Mix well all the ingredients with the electric mixer. I didn't have the special gadget to decorate, so I just used the plastic freezer bag and cut a tiny hole in the corner. Worked like a charm. Sure, it wasn't as pretty as you see in the store or some magazine, but it tastes great. Not too sweet, has a great lemon bite, superb!